this is more a message to say I'm still alive - apologetic for not updating this page recently. Kind of run ragged with work, community involvement, sorting out various issues (people, PCs, and other "interesting times")
I did get to use the Santa costume the other day, so already it's been used, and got good feedback.
Expecting updates/ progress over the next few months on the following projects:
MOT Spot welders
DTI stand repairs/ rebuild
Picaxe work
portable PC/electronics bench
I daresay there will be more (I've a "things to do" list of over 3 pages single spaced)...Updating this build log is part of it all.
Friday, December 17, 2010
Wednesday, November 3, 2010
Santa costume - hat and final - part 6
The last of the postings regarding making the Santa costume...
The Hat.. Unfortunately the shots I took during the sewing of the hats themselves did not come out (still figuring out why) I made two hats, one standard traditional hat which is basically a cone with a circumference of 650mm (26"), and a height of 600mm (24"). The second hat was a experimental model which will be described soon.
Each hat comprised of a velour outer, a red poly-cotton liner, and fur trim at the brim, and a fur trim pompom at the top.

Figure 1 - hats - Experimental, and Traditional
The liner was simply a truncated cone of similar dimensions to the traditional hat (circumference of 650mm, and a height cut down to 300mm. If worn by itself, it would resemble an oversized cap.
The outer was sewn along the edge (right sides facing, then turn inside out to conceal the stitching), and then the fur trim stitched to the outer so the stitching was facing inwards. The liner was then placed inside, pinned and stitched into place to cover the seams for the attachment of the fur trim at the brim.
The pompom at the apex of the cone was handstitched on.
The experimental hat (combination hat and scarf) was patterned on the traditional conical pattern, but then at the 350mm height, the cone was changed to it had a total height of 1800mm (72"). This meant that the hat resembled a long tube of approximately 100mm (4") diameter for most of it's length, with a flare at the end which took the diameter out to 200mm (8") for the last 350mm (14"). All other aspects of the hat (including the liner) were unaltered from the traditional pattern.

Figure 2 - Pompom making - material, and octagon
So the pompom would match the fur trim used elsewhere in the costume, I made the pompoms from the fur trim. A square of fabric was cut - approximately 150 x 150mm (6" x 6") and the corners folded inwards to form an octagon. A heavy thread was loosely stitched in at each corner, and then around again bisecting each side making 16 points evenly spaced around the octagon. the thread was gently pulled up so the corners and sides pulled in, and the resulting hollow space was filled with assorted offcuts from the fur trim.

Figure 3 - Hollow created in pompom by pulling threads up
It was then pulled up tight and tied off resulting in a pompom which was about 65mm (2.5") in diameter. The heavy thread used to make the pompom and tie it off was left threaded to the hand needle during the previous steps, and then used to stitch the pompom to the hat's apex.

Figure 4- Pompom hand stitched to hat
Other accessories and costume tips.
A couple of shots of the bag which attaches to the belt for holding keys, mobile phone, lollies (candy), etc. Simply a bag made of velour offcuts, and lined in poly cotton - simple belt loops on the back for attachment
Figure 5 shows the interior view of the pouch with a mobile phone, and some car keys in it for the test.

Figure 5- Pouch on belt - interior view

Figure 6 - Pouch on belt, exterior view
The wig/ beard I purchased off Ebay for the costume - 100% polyester, and quite good fit, and shape. It cost about $30 to buy including shipping.

Figure 7 - polyester wig and beard set.
And lastly, some white zinc sunscreen paint... I've played Santa before for various groups (Church, charities, clubs) and seen many others play the part.. I have fairly thick dark eyebrows which show through on most wigs. If I apply a smear of the white zinc to my eyebrows, they whiten out as if I've aged 50+ years, and they don't look out of place. - It beats my old trick of gluing threads from cotton balls to my eyebrows with PVA (White) glue.

Figure 8 - White zinc sunscreen paint (with other unused colours)
Unfortunately we were unable to find a local source of the white zinc paint without buying it in a triple pack with the other bright colours... they'll get fobbed off at some future date, since we're not big fans of running around with fluro blue, or pink faces.
Next project things to document... MOT spotwelder progress, reviewing books, and progress on other projects.
Monday, November 1, 2010
Santa costume - belt - part 5
Santa's belt
The idea was to use some near new automotive seatbelt material taken from one of the cars we'd cut up in training. Based on the that material, I designed a large brass buckle to suit.
Since I didn't have any suitable material to make the whole buckle from one piece, I decided to use some thin brass shim stock for the face of the buckle, and build the bulk of the buckle from thicker, but smaller brass material. Why couldn't I cast a buckle??? That's a story for another day....grumble and mutter.
I cut up the shim stock sheet to give me the shape I wanted, plus folding pieces to cover the joints.

Figure 1 - brass shim stock, and other material
I then cut up some 3/16 x 2" strip to give me the shapes I needed to fill in the back of the buckle. I then folded the shim stock up over the inserted pieces, and sweated it all together with soft solder. My torch is a Primus (Seivert) propane torch with a pencil tip.

Figure 2 - cutting the shim stock with a jeweller's saw

Figure 3- folding in the pieces prior to soldering
Once finished I tested the buckle only to find it didn't "grip" the material well enough to give me confidence. I considered adding a small barb in the buckle so it would grip, but figured it might pose a hazard. Determining the issue resulted from the excess clearance in the buckle openings, I drilled the buckle in four places and inserted some 1/16" stainless steel wire to close up the gaps. In fact it allowed me to double the material through the buckle, adding security and improving the appearance. The wire was cut from an antistatic dissipator from an old CO2 fire extinguisher

Figure 4- Buckle - Mk 1 - not suitable

Figure 5. Buckle Mk2 - with wires inserted

Figure 6. The good buckle threaded onto the belt material
I also made a smaller version of the buckle - reminiscent of a military buckle for capturing the excess belt length (tail as it were) - together they both hold the belt up nicely, and I need not fear the jacket coming open. (I started the smaller buckle while trying to think of a way to salvage the first buckle - thankfully I was blessed with some inspiration there... it would have been a shame to waste it.)

Figure 7. Both buckles on the raw material
Once it was all together, I noticed the seatbelt material would shine in certain light, and it looked distracting. To make the belt more consistent, I over-sewed it with 3 layers of black poly-cotton, and sewed rows of stitching the full length on 6mm (1/4") centres. This added a nice touch to the fabric, and allowed me to taper the open end of the belt making it easier to thread and prevent fraying.
Once the brass was polished up, the belt came out wonderful... the buckle adds a bit of weight, in fact the entire belt weighs in at around 1kg (~ 2 lbs)
Next installment - the hats.
Santa costume - pants - part 4
let's wrap up the Santa Claus costume...
Pants - nothing spectacularly different there compared to the jacket - although there is one sewing tip worth pointing out...
Want inexpensive broad loom calico for projects? Look at Ikea. Ikea sells a quilt cover made of full width calico for about $8. That gives you 2 pieces of calico the full width and length of a QB quilt... in dollars per metre it's by far the cheapest calico I've ever found, even at the 900m width. Whenever I venture near an Ikea, a few of those quilt covers are always on the list, just for the cheap fabric. The SB cover is called "Bomull", I'd have to look up the QB sized one, but they're usually next to each other in the shop (says Des who hasn't been in Ikea for over 12 months...) IF it saves someone else money, it was worth putting here...

Figure 1. Cheap calico courtesy of Ikea
Basically the pants (I made two pairs) were made using the velour material and the patterns generated. I then lined the inside with the calico, and made a waistband of red polycotton.
The waistband has a drawstring channel in it, and suspender points.

Figure 2. Velour outer being pinned to calico liner
Originally the suspender points were simple tabs which the jaws of the suspenders could affix to, but during test wears I found the jaws would occasionally let go - to beat this issue, I added a small tab at the front with a button, and a larger tab at the back with a corresponding buttonhole. The suspender jaw grips the original tab, and then the buttonholed tab is fed through the loop on the jaw, and buttoned down so it cannot let go.

Figure 3 - original suspender tab

Figure 4 - buttonhole tab threaded through loop

Figure 5. Button tab visible

Figure 6. tab buttoned down for securing suspender
The fur trim added at the bottom has a band of seatbelt material added inside for weighting the cuff downwards, and accentuating the flare of the cuff so the boot is covered better. In the original test fit, the trim would ride up the boot and looked "dorky".. almost like Santa was wearing clamdigger pants. With the weighted trim, the pants naturally fall to the top of the ankle, and ride up only slightly when seated.
No trim is at the waist since it's under the jacket, and would make adjustment with the drawstring harder.
Still to cover... belt, and hats. I'll most likely wrap them both together just to get this documentation finished.
Thursday, October 7, 2010
Santa costume - jacket - part 3
The jacket was made by cutting out the panels for the back, front panels, and sleeves as per the pattern developed in part 1.
The lay of the fabric was maintained based on the arrows in the patterns. Once sewn together, the lining was made from standard polycotton (as used in making applique quilts) using the same patterns, and then placing it inside the jacket with all seams facing inside the jacket.

Photo 1 - cutting fabric from pattern
The collar of the jacket needed to stand up so any clothes worn under the jacket will not show, I decided the jacket collar needed some stiffening. I designed a flat collar which resembles a mandarin collar from the back, but lays flat as it comes down the front panels.
The stiffener material I used is some seatbelt webbing I salvaged from some of the road-crash training cars.

Photo 2 - Seatbelt and fur trim for collar and it's stiffening
I cut the seatbelt fabric to make the collar higher at the back, and tapering down as the collar crosses over at the front.
The liner was inserted inside the jacket outer, and pinned in place. This allowed for minor adjustments in fit, and the positioning of the internal pocket for the gloves which was sewn in place prior to joining the outer and inner together.

Photo 3 - Jacket outer and liner pinned together
I then stitched this into the fur trim and then stitched this into the layers between the jacket outer, and the liner. This was accomplished by turning the jacket (with it's liner) inside out, and stitching it all together, but leaving a turning area of about 300mm (12") unstitched at the back of the jacket.

Photo 4 - Fur trim pinned in place for sewing into jacket layers
Once the sewing was done, the jacket was turned "right side out" and the turning opening was closed by careful pinning and sewing. To reduce the appearance of the closed seam, I used a derivative of the bias tape method, where I sewed the fur trim to the outer, then reversed the lay so it sat properly and then over-sewed the seam with the liner held in place with pins, this concealed the stitching for the outer/trim seam, and allowed the seam for the liner/trim to be hidden in the seam of the first set of stitching - sorry no photos to simplify the description.

Photo 5 - the finished jacket showing the liner in place
The photo above (photo 5) is where I was trying to determine if a single width belt looked OK, compared to a double width belt.
The pants were made in a similar manner, but will be covered in another posting.
Santa Costume Finished - Part 2
Well the santa costume is done...
There will be more parts put up to show how the costume was made - stay tuned..
The costume comprises:
1 - Jacket with cross-over front panels, internal lining, internal pocket (for gloves), shaped collar, fur trim
2 - Pants - lined, with drawstring and suspender tabs, weighted shaped cuffs, fur trim (2 pair made)
3 - modesty panel under jacket
4 - belt with brass buckles, and attachable "pouch" for lollies, keys, phone, etc
5 - Hat - 2 made, one traditional, one "special"
6 - Boots
7 - Gloves
8 - Beard and wig
There will be pages made for the pants, jacket, and belt so I won't discuss them here.

Photo 1 - showing the traditional hat
The boots are an old pair of structural fire boots (tread worn away to nothing) which I polished up and they're now in the costume set.
The wig and beard were a set I bought on E-Bay
The modesty panel is basically a large calico bib which I put on under the jacket - it's sole purpose is to prevent my shirt showing through the beard between the front panels of the jacket. Last year I went straight to a "santa run" from work and my bright "safety orange" work shirt was showing through the beard - not a good look for Santa. I deliberately wore the same shirt in these photos just to make sure the costume completely covered my clothes without ruining the look.
The belt pouch is simply a lined bag with belt loops which can be threaded onto the belt so Santa has an external pocket for stowing lollies (candy), keys, mobile phone, etc

Photo 2 - the costume
The hats were fun.
I'll probably do a page on the hats, but some of the photos didn't work out so there will be some gaps in the documentation.
Basically one hat is the typical design - about 600mm (24") tall, whereas the other is 1800mm (72") tall. The second one was a fun piece I made to try a theory about a hat also being able to be a scarf. Both hats were made from the same crushed velour fabric that the jacket and pants were made from, and used the same fur trim for the brim, and the pom-pom. Both hats are lined as well.

Photo 3 - Santa with the longer hat
Since Bender kept me company outside whilst I was sewing, it's only fair he gets to try on the hat...

Photo 4 - Bender modelling the scarf-hat
Since I don't have a large model of the Santa Robot, this will have to do...

Photo 5 - Santa and Bender - not menacing at all
I'll document the jacket, pants and belt over the next week (time permitting) and then get back to documenting (and working on) the MOT spotwelder, and a few other projects I'm trying to clear off the "to do" list.
Project costs (AUD):
about $80 for fabric
$30 for the beard and wig
approx 50 hours of sewing, metalwork, etc
maybe $10-20 for incidentals (power, threads, gas, etc)
The day after I completed this project my wife pointed out a costume for sale in one of the online clearance sites... the costume cost about $80 shipped, but it was a thin felt set - the type which only last 3-4 wearings before falling apart... I'd like to think this costume will last many many years so I hardly begrudge the costs in time or money.
Sunday, September 19, 2010
A new project - a Santa costume - part 1 - pattern development
Yes I'm still alive, and a bit stupid since I've added more projects to my "to do list"
Over the past week, I've attended a few callouts for fire and rescue, worked 5 days, and also attended a course (pump operations)
In the "spare" time I attended training for vollies, salvaged the shafting from 7 gas struts (see my earlier shed tip about that), and commenced this new project.
The Santa suit...
One of the fundraising activties carried out by the volunteer Fire and Rescue involves hiring out a "Santa" for local parties. Santa shows up in a 1950 Bedford fire truck (with original lights and siren) and is escorted into the party by a VFRS member... the kids love it, and it's fun work.
The santa costume worn by the volunteer is one of a few, some privately owned, and a couple owned by the brigade - after using one last year which was getting a little long in the tooth, I decided to make my own.
I bought the fabric through Spotlight, and made the pattern up myself.
This posting will discuss the development of the pattern.
Santa's outfit comprises a jacket, a pair of pants, a hat, and some trimmings (not to mention a jolly old fat guy in the middle)
This project will make the jacket (with internal pocket for gloves), 2 pairs of pants, a couple of hats, a belt, and maybe some spats (overboots)
I started the pattern development by grabbing some cardboard wrappers from whiteboards we bought at work - the large sheets of thin cardboard became my primary working material, and also protected the fabric from picking up stains from the trestle table I set up to work from.
I laid out my turnout coat on the cardboard and traced out the key dimensions of the arms, shoulder, waist, and inner/outer seams of the pants.

Figure 1 - using my turnout coat to start the tracing of dimensions

Figure 2. Adjusted tracing of the arm panel, and leg panel
Since I don't have any of that wide thin paper used for making patterns, and I'm not going to cut up my meagre stash of interfacing for a pattern I'll only use once in a blue moon, I decided to fall back on my old trick of using plastic sheet for the pattern material. (I have a stash of tranlucent builder's plastic used for covering gear during cyclones)
The plastic was laid over the tracing, and drawn through with a permanent marker (sharpie, Nikko, whatever your local term is). During this tracing, I made adjustments to the dimensions for cutting/ seam alowance, and changed the cut of the jacket to a more "universal" fit.

Figure 3. Tracing jacket back panel on to translucent plastic
The adjustments made to the pattern included making places for folding the fabric when cutting, and rearranging the seams for joining the arms so they had a natural fit when reaching.

Figure 4. marking on the arm panel plastic to show cuts, direction of fur lay, and number of panels.
Since I was planning on using a crushed velour for the main suit fabric, I had to mark on the lay of the fur (direction) so it looked proper when assembled.

Figure 5. Pants panel patterns.
The last part of the pattern work at this stage was to capture the notes regarding how the suit was to look and go together. Figure 6 shows the notes made regarding the fit of the jacket, placement of fur trim, and trimmings such as pockets and belt loops.

Figure 6. Pattern notes
The next installments will cover the making of the jacket, and belt - hopefully within the next 7 days I'll get the suit finished, then I'll get the documentation done.
Friday, September 10, 2010
Jeanie's Bottle
I know, I know... I promised myself I'd keep this up to date, and regularly updated... plans of mice and men. Lots of things to blame, but ultimately it rests with me to update this record more often.
Over the past month I've probably spent a whopping total of 12 hours in the shed, and 4 of those hours was for someone else's benefit...
To partially redeem myself from the lack of updates, here is the documentation of a project I did 18 months ago (or so)
My wife is a fan of the TV show "I Dream of Jeannie".. for those with more money than I, you can purchase reproductions of the Jeannie bottle... I didn't have the money to spare so I looked at making one for my wife.
I started with some ceramic blanks purchased through Ebay - the original bottle was a glass bottle (Jim Beam 1969) modified and painted up by the studio, then after the success of the show, Jim Beam issued a regular run of the glass bottles for collectors - they go for around $80-100 USD on Ebay... the ceramic blanks cost around $25-35 USD each.

Figure 1. Ceramic bottle blanks
The blanks arrived (after some hiccups with post) and I primed and sanded them several times using automotive spray primer, and 600-800 wet and dry paper.
 F
F
Figure 2. Primed bottles in box
The bottles were stored in a cardboard box whenever the paint was drying, or not being worked on.. partly to prevent dust settling on the paint, but also to prevent the bottles from being seen by the recipient. Typically whenever I make a present for my wife (or children) I will make it in secret, and only give it to them once it's completed.
After suitable layers of primer and sanding, the bottle was spray painted with 2 coats of cheap gold spraypaint (for base colour), then 3 layers of metallic gold paint. The final coats of gold were supposed to be able to give me a polished gold finish - it came out more like satin over brass, but that was OK... the "original" bottle would have been enamel over brass, and that was the effect I was trying to achieve.
Then started the painting of the colours - I started with some thin coats of a translucent purple so the gold/brass could come through, then added opaque detailing.
 Figure 3. Bottom of bottle showing base "gold" coat under translucent colouring.
My guide to colours and placement was a number of photos taken from the web, and a $5 painting/template guide I purchased on Ebay - Apparently there are about 5-6 different bottles shown on the show (Jeannie - Season 1, Jeannie - the rest of the seasons, then other characters) This paint scheme is the "Jeannie - Season 2 onwards" colouring.
 Figure 4. Colours applied according to the painting guide
Adding the detail was painstaking at best. I've never used brushes so fine, and I never realised how much my hands shake when doing this kind of work. I had to rub back the work here and there, or paint over the occasional error, but generally it came out OK.
Once completed (or as close as I dared) I then started applying coat after coat of clear decoupage varnish over the entire thing to seal it all, and to add some slight gloss to the finish.

Figure 5. Varnish drying on finished bottle.
Once completed I wrapped them up for a Christmas gift. Below is the photo she took after unwrapping them. Everything we own is photographed for insurance purposes, and typically on our kitchen table.
 Figure 6. Finished bottles as unwrapped.
One day I'll figure out how to make and fit a Barbara Eden in the bottles, but until then, I'll continue working on making my own (and my wife's) wishes come true by hard work instead of a "blinky head nod".
The paints were predominantly "Jo Sonia" glass paint, and folk art paint, and the spray paints were those left over from model rocketry.
Hours to "build" was in the order of 50-60 hours of work, plus about the same again waiting for paint/ varnish to dry.
Projects coming up:
MOT spotwelders, indicator stand repairs, taper turning attachment construction, lathe stand/motor construction just to name a few.
Over the past month I've probably spent a whopping total of 12 hours in the shed, and 4 of those hours was for someone else's benefit...
To partially redeem myself from the lack of updates, here is the documentation of a project I did 18 months ago (or so)
My wife is a fan of the TV show "I Dream of Jeannie".. for those with more money than I, you can purchase reproductions of the Jeannie bottle... I didn't have the money to spare so I looked at making one for my wife.
I started with some ceramic blanks purchased through Ebay - the original bottle was a glass bottle (Jim Beam 1969) modified and painted up by the studio, then after the success of the show, Jim Beam issued a regular run of the glass bottles for collectors - they go for around $80-100 USD on Ebay... the ceramic blanks cost around $25-35 USD each.
Figure 1. Ceramic bottle blanks
The blanks arrived (after some hiccups with post) and I primed and sanded them several times using automotive spray primer, and 600-800 wet and dry paper.
 F
FFigure 2. Primed bottles in box
The bottles were stored in a cardboard box whenever the paint was drying, or not being worked on.. partly to prevent dust settling on the paint, but also to prevent the bottles from being seen by the recipient. Typically whenever I make a present for my wife (or children) I will make it in secret, and only give it to them once it's completed.
After suitable layers of primer and sanding, the bottle was spray painted with 2 coats of cheap gold spraypaint (for base colour), then 3 layers of metallic gold paint. The final coats of gold were supposed to be able to give me a polished gold finish - it came out more like satin over brass, but that was OK... the "original" bottle would have been enamel over brass, and that was the effect I was trying to achieve.
Then started the painting of the colours - I started with some thin coats of a translucent purple so the gold/brass could come through, then added opaque detailing.

My guide to colours and placement was a number of photos taken from the web, and a $5 painting/template guide I purchased on Ebay - Apparently there are about 5-6 different bottles shown on the show (Jeannie - Season 1, Jeannie - the rest of the seasons, then other characters) This paint scheme is the "Jeannie - Season 2 onwards" colouring.

Adding the detail was painstaking at best. I've never used brushes so fine, and I never realised how much my hands shake when doing this kind of work. I had to rub back the work here and there, or paint over the occasional error, but generally it came out OK.
Once completed (or as close as I dared) I then started applying coat after coat of clear decoupage varnish over the entire thing to seal it all, and to add some slight gloss to the finish.

Figure 5. Varnish drying on finished bottle.
Once completed I wrapped them up for a Christmas gift. Below is the photo she took after unwrapping them. Everything we own is photographed for insurance purposes, and typically on our kitchen table.

One day I'll figure out how to make and fit a Barbara Eden in the bottles, but until then, I'll continue working on making my own (and my wife's) wishes come true by hard work instead of a "blinky head nod".
The paints were predominantly "Jo Sonia" glass paint, and folk art paint, and the spray paints were those left over from model rocketry.
Hours to "build" was in the order of 50-60 hours of work, plus about the same again waiting for paint/ varnish to dry.
Projects coming up:
MOT spotwelders, indicator stand repairs, taper turning attachment construction, lathe stand/motor construction just to name a few.
Sunday, August 22, 2010
Shed tips - free shim steel, and parallels
just another post to prove I'm alive, and trying to live up to my commitment to publish up the things I find useful, hoping someone else finds them useful.
Another "free" tip - shim steel
The anti-theft widgets I find inside PC software, DVDs and other packages often looks like a small rectangle. Inside is normally 3 pieces of incredibly thin steel - suitable for shimming tool bits up to 1/4" wide.
After several years of cutting these things open, only to fight with the sticky tape inside, this is the easiest way I've found to open the widget.

Figure 1 - the "unopened" widget
Using a sharp knife, slice the case near the bottom flange

Figure 2 - opening the widget
Remove the strips which you can easily - there may be one at the bottom under another layer of sticky tape - leave it at this stage

Figure 3 - the removed pieces, and one still in the case (under tape)
Cut the end off the rectangular plastic, as close to the end as possible

Figure 4 - sliced tape so the last piece can be retrieved
Insert the point of the blade between the tape and the shim, and then slice back into the tape to cut the top off for at least 1/4".
Remove the remaining shim, discard the rubbish.
Result - Three pieces of shim, without any glue residue, or creases.
Bonus Tip - "free" parallels
an oldie but a goodie
Salvaged bearing races make good parallels, particularly for packing on the mill or lathe.
I took the time to dismantle a stash of saved bearings which were not worth saving (sand in the races)
Someone suggested drilling out the rivets holding the cage together - easier said than done, and it cost me a 4mm HSS drill - not again.

Figure 5 - old bearings too rough for use - destined to be dismantled
What I did was use on of my punches to drive the cage towards one side (punched in the gap between 2 balls) so the cage was deformed to the other side, then flipped the bearing and struck it back - I repeated this about 2 times and the cage broke at the point of the flexing. Using the point of the punch, I levered the cage material up, and then started winding it around the points of some pliers - most of the time the metal tore at the rivets, sometimes it broke, and all I'd do is commence from the other side and eventually all the cage was removed.
Then it was simply a case of pushing the balls all to one point in the races, and the inner race was able to be persuaded into the side without balls to drop away freely.

Figure 6 - a collection of free parallels for packing on the lathe.
Each bearing yielded 2 races with perfectly parallel sides, and a number of ball bearings which get filed away for use in detents, etc.
Speaking of detents - I pick up old disposable cigarette lighters whenever I'm out walking the dog - people are forever dropping them on the streets when they run out, or become damaged, The mainspring (the one pushing the flint up) is the perfect size for making/ replacing small detent springs (and extractor springs for rimfire bolts) - just another excuse to bring home junk, then pull it apart and file the parts.
What's on the horizon?
Webpage wise - I'll push to continue reviewing and recommending books - I can do that with little to no shed time.
Shed wise - Added 2 more projects to the "To Do" list (the "do to" list is at 12 major projects, and 23 minor projects and counting) - first is a couple of MOT spot welders (wound the first transformer last weekend), the second is building a electronics device to semi automate gear cutting... there are commercial offerings out there which do this, but the ulterior motive in this is getting my microprocessing skills back - I'm an Electrical/ Electronics engineer by training, but I spend more of my leisure time doing mechanical fitting - the irony has not escaped many people, especially myself.
Another "free" tip - shim steel
The anti-theft widgets I find inside PC software, DVDs and other packages often looks like a small rectangle. Inside is normally 3 pieces of incredibly thin steel - suitable for shimming tool bits up to 1/4" wide.
After several years of cutting these things open, only to fight with the sticky tape inside, this is the easiest way I've found to open the widget.
Figure 1 - the "unopened" widget
Using a sharp knife, slice the case near the bottom flange
Figure 2 - opening the widget
Remove the strips which you can easily - there may be one at the bottom under another layer of sticky tape - leave it at this stage
Figure 3 - the removed pieces, and one still in the case (under tape)
Cut the end off the rectangular plastic, as close to the end as possible
Figure 4 - sliced tape so the last piece can be retrieved
Insert the point of the blade between the tape and the shim, and then slice back into the tape to cut the top off for at least 1/4".
Remove the remaining shim, discard the rubbish.
Result - Three pieces of shim, without any glue residue, or creases.
Bonus Tip - "free" parallels
an oldie but a goodie
Salvaged bearing races make good parallels, particularly for packing on the mill or lathe.
I took the time to dismantle a stash of saved bearings which were not worth saving (sand in the races)
Someone suggested drilling out the rivets holding the cage together - easier said than done, and it cost me a 4mm HSS drill - not again.

Figure 5 - old bearings too rough for use - destined to be dismantled
What I did was use on of my punches to drive the cage towards one side (punched in the gap between 2 balls) so the cage was deformed to the other side, then flipped the bearing and struck it back - I repeated this about 2 times and the cage broke at the point of the flexing. Using the point of the punch, I levered the cage material up, and then started winding it around the points of some pliers - most of the time the metal tore at the rivets, sometimes it broke, and all I'd do is commence from the other side and eventually all the cage was removed.
Then it was simply a case of pushing the balls all to one point in the races, and the inner race was able to be persuaded into the side without balls to drop away freely.

Figure 6 - a collection of free parallels for packing on the lathe.
Each bearing yielded 2 races with perfectly parallel sides, and a number of ball bearings which get filed away for use in detents, etc.
Speaking of detents - I pick up old disposable cigarette lighters whenever I'm out walking the dog - people are forever dropping them on the streets when they run out, or become damaged, The mainspring (the one pushing the flint up) is the perfect size for making/ replacing small detent springs (and extractor springs for rimfire bolts) - just another excuse to bring home junk, then pull it apart and file the parts.
What's on the horizon?
Webpage wise - I'll push to continue reviewing and recommending books - I can do that with little to no shed time.
Shed wise - Added 2 more projects to the "To Do" list (the "do to" list is at 12 major projects, and 23 minor projects and counting) - first is a couple of MOT spot welders (wound the first transformer last weekend), the second is building a electronics device to semi automate gear cutting... there are commercial offerings out there which do this, but the ulterior motive in this is getting my microprocessing skills back - I'm an Electrical/ Electronics engineer by training, but I spend more of my leisure time doing mechanical fitting - the irony has not escaped many people, especially myself.
Monday, August 9, 2010
Scrounging up materials - tips, etc
I am alive – I’ve just been burning the candle at each end, the middle, and a few other places. Mostly work demands due to a sudden change in my shifts, but one thing upon another and I haven’t had as much time, or energy, to sit down and update this site.
I did get to do some cleaning in the shed on the weekend just gone, and as part of that I photographed these two useful tips.
Firstly I need some STRONG steel rod for a couple of upcoming projects. One source of high tensile rod is the rod in a gas strut. I always keep my eyes open for any of these being tossed out, and I opened another 2 on the weekend in front of the camera. NOTE: opening these can be dangerous – I take precautions, but don’t blame me if you get hurt doing this!!!

Figure 1. Gas struts as recovered from being tossed out
The cylinder is filled with pressurized gas and oil. Near the end where the rod comes out there is some crimping which acts like a seal/ travel stop. I dress in appropriate PPE ("Personal Protective Equipment - in this case - ear-muffs, face-shield, leather apron) and work with the grinder and cut area pointed away from me. The first longitudinal cut in that area will suddenly release the gas and oil – I point that in a safe direction and let it vent out. Then once vented, I cut 3 or 4 longitudinal cuts for about 20-30mm above the crimped line. This allows me to remove the rod with it’s piston/ seals captive on the end.

Figure 2. Longitudinal cuts through crimped area to allow piston and seals to be pulled out of cylinder
I then grind off the peened over section of rod, and remove the piston/ seals from the rod.

Figure 3. Showing the peened end of the rod in the piston
The result is a strong, straight length of high tensile steel which has a polished surface. I now have 4 of these rods, one will be used to make the mast/pillar for the magnetic DTI base, another for my upcoming taper turner project, and the other 2 (matched pair) will be set aside as candidates for a Z axis slide in my CNC mill project. The photo below shows the 2 recovered rods on the RHS of the grinder.

Figure 4. Salvaged high tensile steel rods.
A useful tip I picked up from one of the contract firms I saw at a worksite…
We all have had a retractable steel tape measure break on us from time to time, I used to throw them out when I realized I “never get around to fixing them” – Not anymore.

Figure 5. Broken 8m tape measure
Instead I now open them up carefully
Using some heavy duty scissors (good tin-snips will do here as well) I carefully cut the measuring tape into useful pieces

Figure 6. Opened tape measure and snips
Since Oz is a metric country, most tape measures will have meters (with or with out imperial markings on the other side) so I cut the tape on the multiples of 1 meter.

Figure 7. Tape cut on meter markings
The resulting pieces are used as “disposable” yard sticks – useful for taking to messy places, using at the welding table, etc.

Figure 8. Seven 1m "yard sticks" made from one broken tape measure
I keep a stash of them threaded in the frame of the shed door – always there ready for use whenever I need a ruler for measuring something.

Figure 9. About 15 yard sticks threaded in the door frame of the shed.
I have 2 broken tape measures I haven’t cut up yet “in storage” for my CNC mill – these will be affixed on the sides of the axes for quick positioning/ verification under jog/ MPG control.
If I have time, I’ll put up the account of the other salvaged/ scrounged useful junk I worked on during this weekend’s clean up. (free shim steel and “free” parallels)
Time - it always comes back to that - a question of what to do with the limited amount you have each day...
I did get to do some cleaning in the shed on the weekend just gone, and as part of that I photographed these two useful tips.
Firstly I need some STRONG steel rod for a couple of upcoming projects. One source of high tensile rod is the rod in a gas strut. I always keep my eyes open for any of these being tossed out, and I opened another 2 on the weekend in front of the camera. NOTE: opening these can be dangerous – I take precautions, but don’t blame me if you get hurt doing this!!!
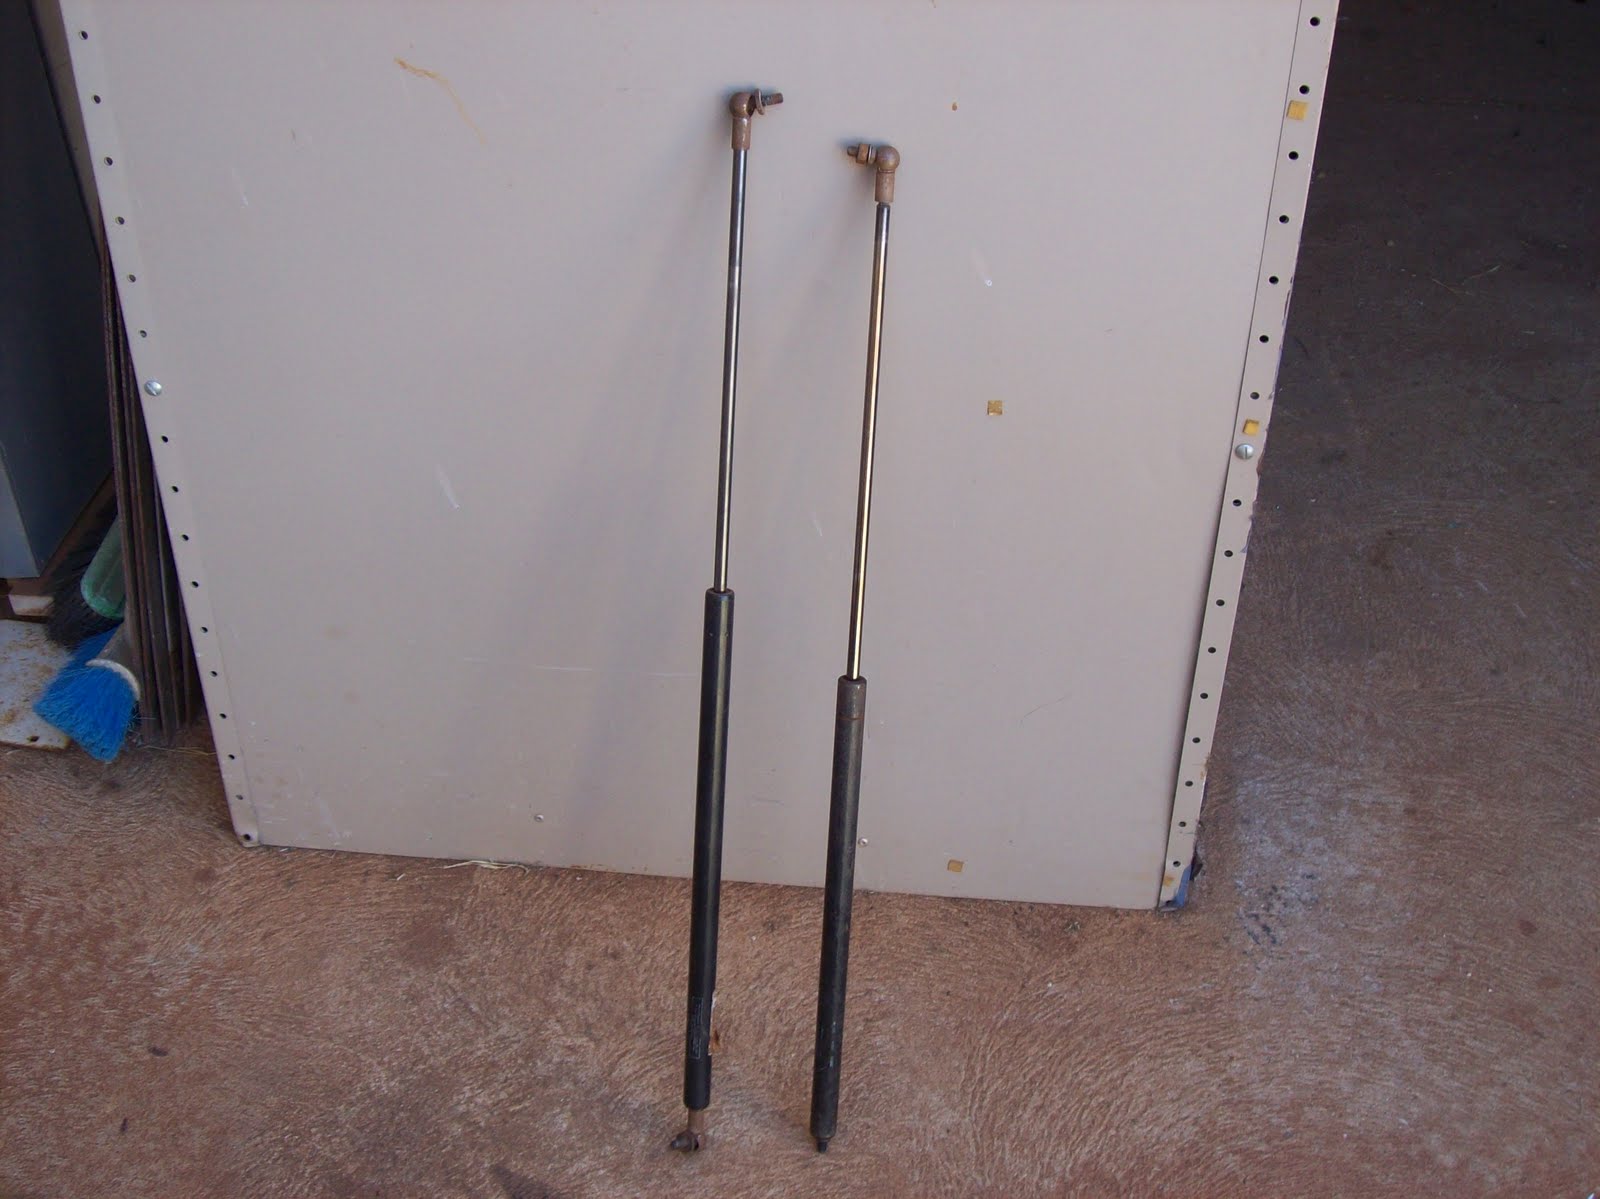
Figure 1. Gas struts as recovered from being tossed out
The cylinder is filled with pressurized gas and oil. Near the end where the rod comes out there is some crimping which acts like a seal/ travel stop. I dress in appropriate PPE ("Personal Protective Equipment - in this case - ear-muffs, face-shield, leather apron) and work with the grinder and cut area pointed away from me. The first longitudinal cut in that area will suddenly release the gas and oil – I point that in a safe direction and let it vent out. Then once vented, I cut 3 or 4 longitudinal cuts for about 20-30mm above the crimped line. This allows me to remove the rod with it’s piston/ seals captive on the end.

Figure 2. Longitudinal cuts through crimped area to allow piston and seals to be pulled out of cylinder
I then grind off the peened over section of rod, and remove the piston/ seals from the rod.

Figure 3. Showing the peened end of the rod in the piston
The result is a strong, straight length of high tensile steel which has a polished surface. I now have 4 of these rods, one will be used to make the mast/pillar for the magnetic DTI base, another for my upcoming taper turner project, and the other 2 (matched pair) will be set aside as candidates for a Z axis slide in my CNC mill project. The photo below shows the 2 recovered rods on the RHS of the grinder.

Figure 4. Salvaged high tensile steel rods.
A useful tip I picked up from one of the contract firms I saw at a worksite…
We all have had a retractable steel tape measure break on us from time to time, I used to throw them out when I realized I “never get around to fixing them” – Not anymore.

Figure 5. Broken 8m tape measure
Instead I now open them up carefully
Using some heavy duty scissors (good tin-snips will do here as well) I carefully cut the measuring tape into useful pieces

Figure 6. Opened tape measure and snips
Since Oz is a metric country, most tape measures will have meters (with or with out imperial markings on the other side) so I cut the tape on the multiples of 1 meter.

Figure 7. Tape cut on meter markings
The resulting pieces are used as “disposable” yard sticks – useful for taking to messy places, using at the welding table, etc.
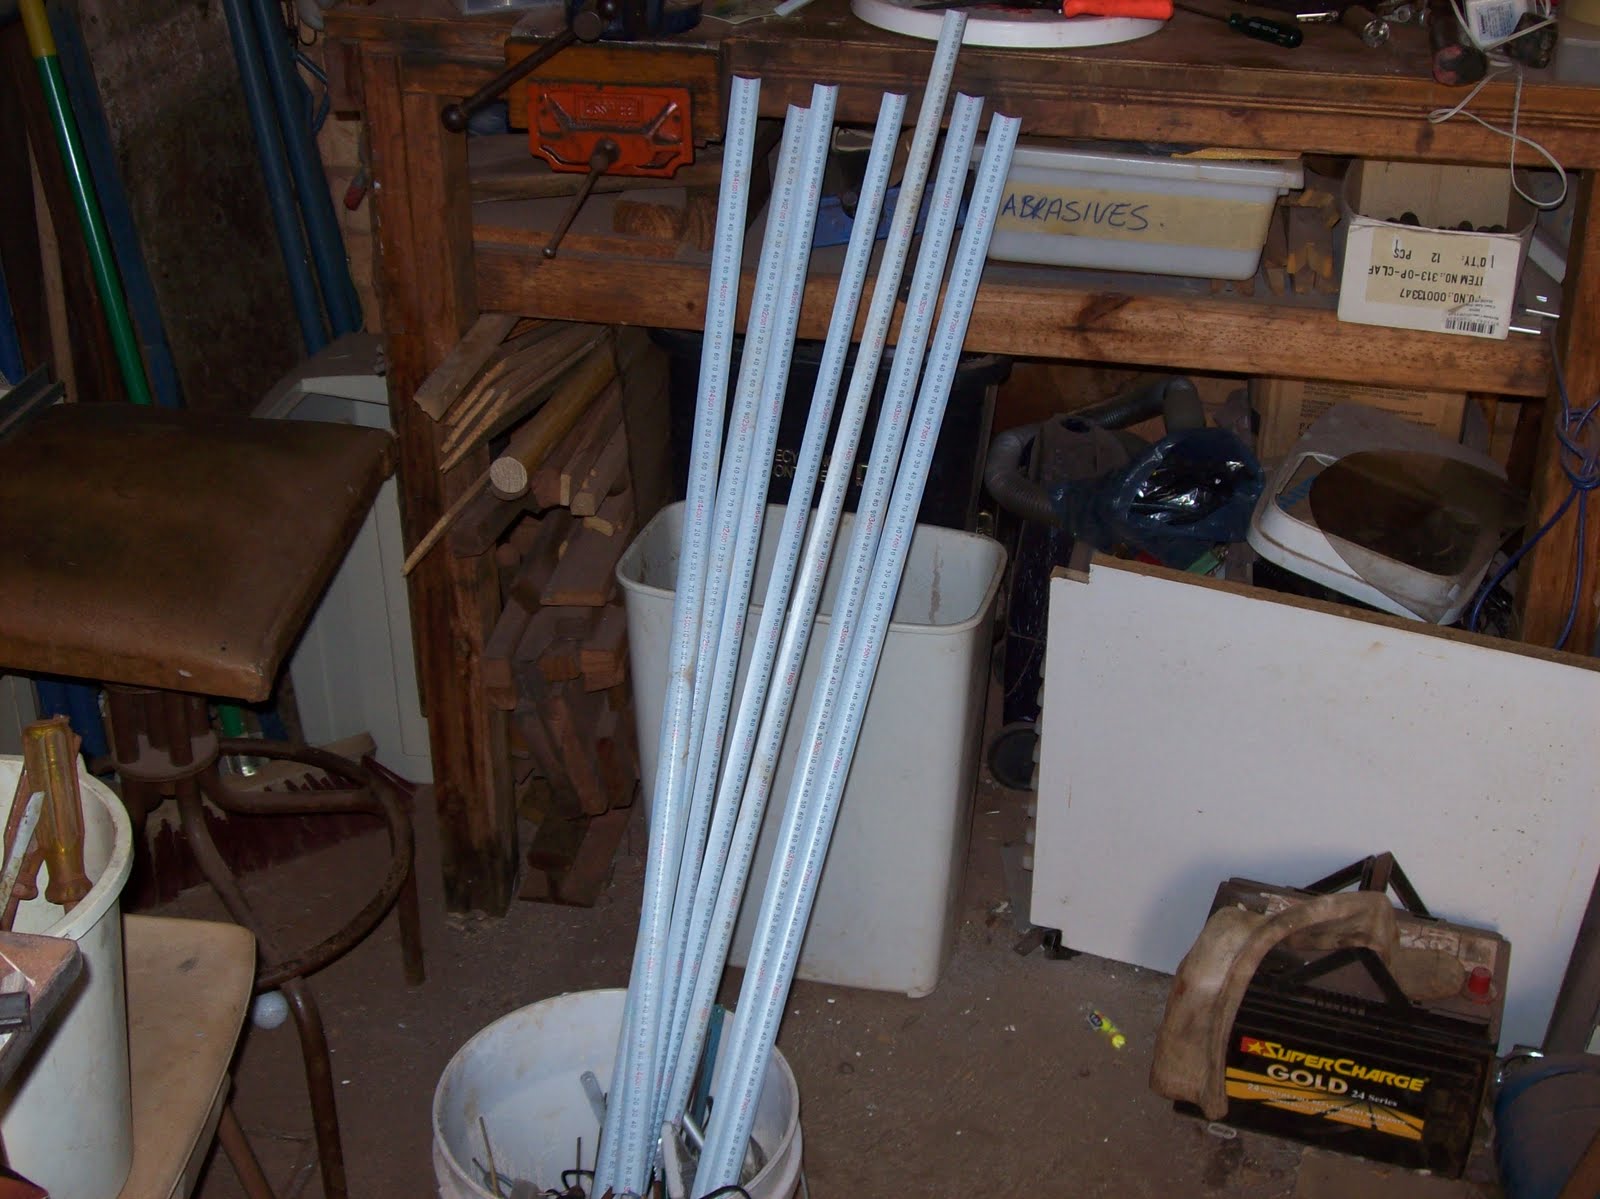
Figure 8. Seven 1m "yard sticks" made from one broken tape measure
I keep a stash of them threaded in the frame of the shed door – always there ready for use whenever I need a ruler for measuring something.

Figure 9. About 15 yard sticks threaded in the door frame of the shed.
I have 2 broken tape measures I haven’t cut up yet “in storage” for my CNC mill – these will be affixed on the sides of the axes for quick positioning/ verification under jog/ MPG control.
If I have time, I’ll put up the account of the other salvaged/ scrounged useful junk I worked on during this weekend’s clean up. (free shim steel and “free” parallels)
Time - it always comes back to that - a question of what to do with the limited amount you have each day...
Subscribe to:
Posts (Atom)
